There are a few things that need to happen in order to produce muscle growth. You need to use significant load when lifting weights Enough time under tension to create structural damage to the muscle tissue Enough stimuli to up-regulate anabolic hormones and increase protein synthesis Proper recovery and workout nutrition Many people often think that if they lift as heavy as possible, or use as much volume (sets and reps) as possible they will […]
3 Exercises Worth Doing Everyday
Training Smarter, Not Harder
In my earlier years of exercise, I would work out hard and often. Starting my junior year of high school, I lifted 5-6 days per week. I would even lift before or after my football and basketball games and practices sometimes. Or I would get up at 5 am before school. You could call it obsessive and overtraining but it kept me in shape and out of trouble, for the most part. It taught me discipline with my sleeping and eventually my eating habits. It even helped me develop a discipline of reading and studying both fitness and my studies in college.
While I did get a lot more educated and smarter about my training as time went on, I pushed to the edge of training for the better part of 17-years. Eventually, my body took its toll and injuries started popping up. I was blessed to be virtually pain and injury free for that time period but when it rained, it poured. Since I was 33 (I am now 36), I have had to put the brakes on all-out intense training and avoid many exercises I once did copious amounts of.
With 2 hip surgeries under my belt, lumbar issues, anterior shoulder, and now cervical spine problems, my training is much different. I wouldn’t trade my hard training years for anything and I have zero regrets. But learning when and how to deal with sports injuries is inevitable for the highly active individual. I now take a training approach of doing just enough, but exercising often. I move every single day, maybe it is 10-minutes of exercises that simply help me move better, or it could be a 50-minute workout that includes more intensity but never to failure.
Some of the most respected trainers in the world have preached this method. Coaches such as Dan John, Pavel Tsatsouline, and MMA trainer, Firas Zahabi, take this approach with their athletes.
- Train often but not to failure.
- Keep the volume enough to stimulate but the intensity just enough to where you are not too sore and feel refreshed the next day.
- If you are totally exhausted and feel beat up the next day, you are going to hard.
There are a time and place for intensity, but doing enough often and for the long-haul will help you build in tons of volume to your training while reducing the risk of pain and injury.
I have found 3 exercises that have particularly helped my overall movement quality and do not cause any pain and in fact, make my body feel much better when I am feeling a bit tight. So if it makes you feel good and helped you move better, I suggest doing these exercises every day.
Many of us have 2 key areas that need attention: The hips and the shoulder area. Many factors such as sitting more and overusing these areas can cause imbalances, asymmetries, loss of mobility, and flexibility. Doing exercises each day to help improve the overall movement in these areas will pay dividends over time.
Here are 3 daily exercises that will give you a huge improvement over time
1. 90/90 Hip Stretch
If you spend much time at a desk, in a car, or on a couch, you probably have reduced hip mobility. And you probably don’t even notice it because you don’t feel it in your hips. But if you’ve ever had lower back pain after a long day at work or had trouble squatting all the way down to pick up a bag of groceries, chances are your hips need some attention.
Our hips and the muscles that surround them are the base for most of our movement. Unfortunately, the necessities of daily life can make our hips less functional than we’d like. Sitting most of the day stiffens the hips and can make them weaker from prolonged positioning.
This is not ideal for us, and not ideal for the workhorses of our body. It’s important to spend some time each day remedying the issues many of us have with tight, dysfunctional hips, which is why I created the stretching sequence in a previous article for Healthy & Fit (March 2017 5 Mistakes You Are Making in The Gym) to help open up the hips. The ½ kneeling hip flexor stretch and the glute hip lift are wonderful exercises to keep your hips healthy.
This exercise will help you improve your internal and external rotation range of motion in the hips. These are two areas we also forget to improve range of motion. We tend to focus more on the front of the hip (people think of hip flexor), but neglect the internal and external rotators. I’ll describe in this article the 90/90 hip external and internal rotation stretch to improve hip mobility and help alleviate lower-back stiffness.

To get into the 90/90 positions
Your lead leg should be directly in front of you, bent to 90 degrees. Line it up with your heel. The trail leg should be to the side also be bent to 90 degrees, with the heel lining up with the back leg.
When you’re in the position, extend your back. Try to get your belly button to hover over your knee. If you lean forward keeping your chest up high, you’ll get a deep stretch in your lead leg. What you’re stretching here is the gluteus minimus muscle, piriformis and external rotators of the hip.
While you move forward to stretch that area, push the knee and ankle of the trail leg behind you into the ground. This will help stretch your internal rotators (think groin area) of the hip. Make sure to take deep belly breaths as you are in this position. DO NOT force the range of motion at all and back off when needed.
Note: If you are tight in the hips you will find it hard to keep the lumbar curve and pelvis tilted forward. To help maintain the curve in the lumbar spine you can place your hands behind you to help support a more upright posture. This modification is very important for anyone with a history of back pain because it prevents you from over-stretching the low back during what is intended to be a hip stretch.
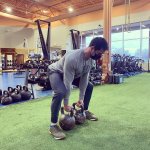
2. Kettlebell Arm Bar
You may be thinking that I am going to talk about an armbar in mixed martial arts (MMA). I am no MMA professional, nor do I even know how to put someone in an armbar.
This particular armbar is from the fitness world. It is an exercise that can dramatically improve your shoulder mobility and posture, something we all could use a little more of. With our forward posture positions from daily activities such as texting, driving, sitting at a desk, and eating, our shoulder tends to gravitate forward just a little bit too much.
The kettlebell armbar is the single best shoulder mobility and stability drill that you can practice. It provides both functional applications to both specific training movements such as the overhead press or tennis and daily life movements such as checking your review mirror and putting up something high on a shelf. Anyone of any level can benefit from this exercise and it is easy to perform.
Why Is the Arm Bar Needed?
In our world today we have no choice but to put ourselves in forward-posture positions. We sit in meetings all day at work, endless hours at a computer, or maybe it’s the long commute to work each day. Either way, those postures can encourage excessive internal rotation, stiff tissue, and poorly moving glenohumeral (shoulder) joint. This can cause an unfavorable range of motion and even pain in the shoulder, increasing the chances of injury.
The shoulder joint also needs to be stable and if mobility and flexibility are compromises, it will be hard to gain stability. The armbar helps both by encouraging the proper position of the shoulder and activation and strength of the rotator cuff muscles.
The shoulder joint is not the only area that can be compromised due to poor posture. The thoracic spine also takes a good beating and can become very stiff. If the thoracic spine is not supple enough the shoulder joint will have a hard time functioning to full capacity. When our thoracic spine is stiff, the body finds other structures to move in order to make an action happen. The body then typically resorts to using the lumbar spine.
As you can see, poor shoulder position causes a stiff thoracic spine, which leads to the lower back doing work it shouldn’t. The armbar can help take care of all of these issues. The armbar mobilizes the shoulder and begins to stretch and move these tight tissues. It puts the shoulder joint in the right position packing the shoulder and stabilizing it. It encourages the shoulder to move freely without any major force application.
Performing The Arm Bar
 Lay on your back. Set up with a *light kettlebell in your left hand. Press the left arm to lockout for the entirety of the movement. The starting position should look like that of a get-up.
- Bring the stance narrow and the right hand vertically overhead, palm up.
- Using your left leg, drive the torso into a roll, using the right leg and right arm as the axis.
- Place your left knee on the ground at a right angle from your hip. Your head rests on your right bicep.
- Stacking the shoulders and the hips, begin to
 rotate the torso, leaving the kettlebell at “proprioceptive vertical.” Proprioceptive vertical describes the center of mass of support. If the bell is big enough, the center of mass may be over the shoulder joint and the arm appear tilted. This is only usually the case with larger bells.
 - Flex your left shoulder. Use your lat to pull the shoulder blade down, packing the joint into a stable position while still relaxing your neck and resting your head on your right bicep.

- Begin to straighten out both legs. Your knees should lock and your toes should point.
- In this position, you can now start a breathing rhythm that coincides with a
glute contraction. Contract your left glute and exhale simultaneously. The left side of the chest will follow this rhythm also slowly getting closer to the ground with each rep. - Allow the shoulder blades to pull together but never up. Do not shr
 ug. Pack the lats down and allow for the scapula to slide over the rib cage smoothly.
 - After five or so breath/contractions, slowly reverse the movement. Return to a supine lying position before haloing the bell safely repeating on the opposite side.
Start by performing three reps on each side, holding for five breaths/contractions. Use a light bell, to begin with. The purpose of this drill is not an excessive range of motion or load. The integrity of the joints, muscles, and the movement should be respected at all times.
*I would advise females to use 10-12kg and males to use 16-20kg, to begin with, but choose what you feel is appropriate for your level and needs.
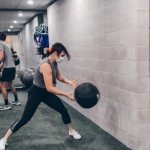
3. Goblet Squat
Dan John, a legendary strength coach, has popularized the saying “If it’s important, do it every day. If it’s not important, don’t do it at all.” Wrestling champion, Dan Gable, also popularized this saying as well. Since 2006, this advice has always resonated with me and I have used this mindset as part of my training and nutrition philosophy; if it is good for me I try to do it every day. Kind of like why I take fish oil, drink lots of water, and consume wheatgrass on a daily basis; it’s important!
So, how does this advice apply to the goblet squat? Well, Dan John created the goblet squat so we know he was smart in life (he studied and teaches philosophy!) and in the weight room. And we all need to squat in some way, shape or form each day. You can lose the ability to squat as you age, which can hinder you from performing some of the most basic daily tasks. Don’t you need to sit to your chair, get up, bend down to grab something?
There are so many things that need to take place in order to even squat well. You need good foot mechanics, ankle mobility, strong quadriceps, good hip mobility, functional glute contraction, strong lumbar erectors, lumbopelvic stability, strong thoracic extenders, and some good coordination to put this all together in one movement. That’s a heck of a lot of things to be good at!
You Need To Practice
Over the past year and a half, my squat pattern has been compromised. I had my second hip surgery in December 2016 on my right labrum to take care of some impingement and microfractures. Due to my hip issues, my lower back started to flare up. I lost my ability to squat correctly and my hip mobility was lacking. So, I decided to really tackle my squat pattern and the goblet squat was my tool of choice. Since improving my squat pattern, my hip mobility has improved and my low back pain has been minimized. It took time and patience but eventually, the pattern came back.
It will take some time to learn the proper squat and achieve optimal depth but just be patient. If you have pain during the squat make sure you work with someone that knows what they are doing, maybe a trainer or medical professional.
If you are someone that can squat correctly with no pain already, awesome! Keep it up by performing the goblet squat each day. If you are not someone who can squat correctly, you need to consider doing so now. If you don’t use it, you lose it. The mechanical characteristics that I described above will erode over time if you don’t squat. This can also affect other movements such as walking, running and picking up objects. Luckily for everyone, this erosion of movement quality can be prevented.
Building flexibility, strength, and coordination can be difficult, but maintaining these qualities is much easier. If you perform goblet squats every day you will maintain the ability to squat for years to come. This will require you to grab a weight (not that heavy), and perform 5-10 full range of motion goblet squats each day. Yes, each day, or at least 5 days per week. Think of it just like brushing your teeth. If you skip a day, you will be able to tell the difference between your teeth. If you skip a day with the goblet squat, your body will know.
Please keep in mind that the goblet squat can have a strong purpose as well as a movement quality purpose. In this case, we are using it to improve movement quality. A weight that is just enough will do. Typically 10-30 pounds for women and 20-50 pounds for men, depending on ability.
You may ask why the goblet squat and not just a basic bodyweight squat? The simple answer is the weight allows your core muscles to activate, allowing you to have better posture and also pulls you down into a better position for a full range of motion. Think of it as assistance for good form. 
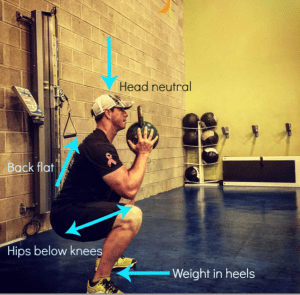
Simple Guide to Squat Better
It is imperative that you perform this exercise correctly. Please use this guide to help you get started.
- Use a dumbbell or kettlebell and tuck it into the upper chest.
- Keep your elbows in tight.
- Place your feet slightly wider than shoulder-width apart with 0-30 degrees of foot flare.
- Pull yourself down into the squat slowly.
- Push your knees out to the sides and have your elbows track inside the knees.
- Push all the weight of your body through the heels, while keeping your full foot on the ground.
- Keep your chest up.
Understanding how to squat is important. Maintaining this movement pattern for the rest of your life is even more important. Take 10-minutes each day to keep your body feeling young, healthy and vibrant with the 90/90 stretch, kettlebell armbar, and the goblet squat. It worked for me and I am confident that it will work for you.
Come Train With Us! Click Picture Below to get Started!


Leave a Reply